Hackerspace Passport Explained
A deep dive into the Hackerspace Passport and its significance in hacker culture.
A deep dive into the Hackerspace Passport and its significance in hacker culture.
You can make the Digispark appear as any USB device by setting the USB IDs to a custom value, and I’ll show you how. But first, why would you?
It’s particularly useful for BadUSB pentests where you don’t want it to appear as a Digispark but as a generic USB Keyboard or an Apple device so that macOS doesn’t open the keyboard setup assistant. You might also require a USB device with a particular vendor or device ID for testing and developing products.
Whatever your reasons are, you can spoof the IDs to anything you want. Websites like devicehuhnt.com have a database that you can search for registered USB devices.
In the tutorial below, I will make the Digispark appear as an Apple keyboard so that it can be used for BadUSB attacks on macOS. But you are free to change the values to whatever you like.
You have to edit the USB Product ID (PID) and Vendor ID (VID) deep in the Arduino Digispark files.
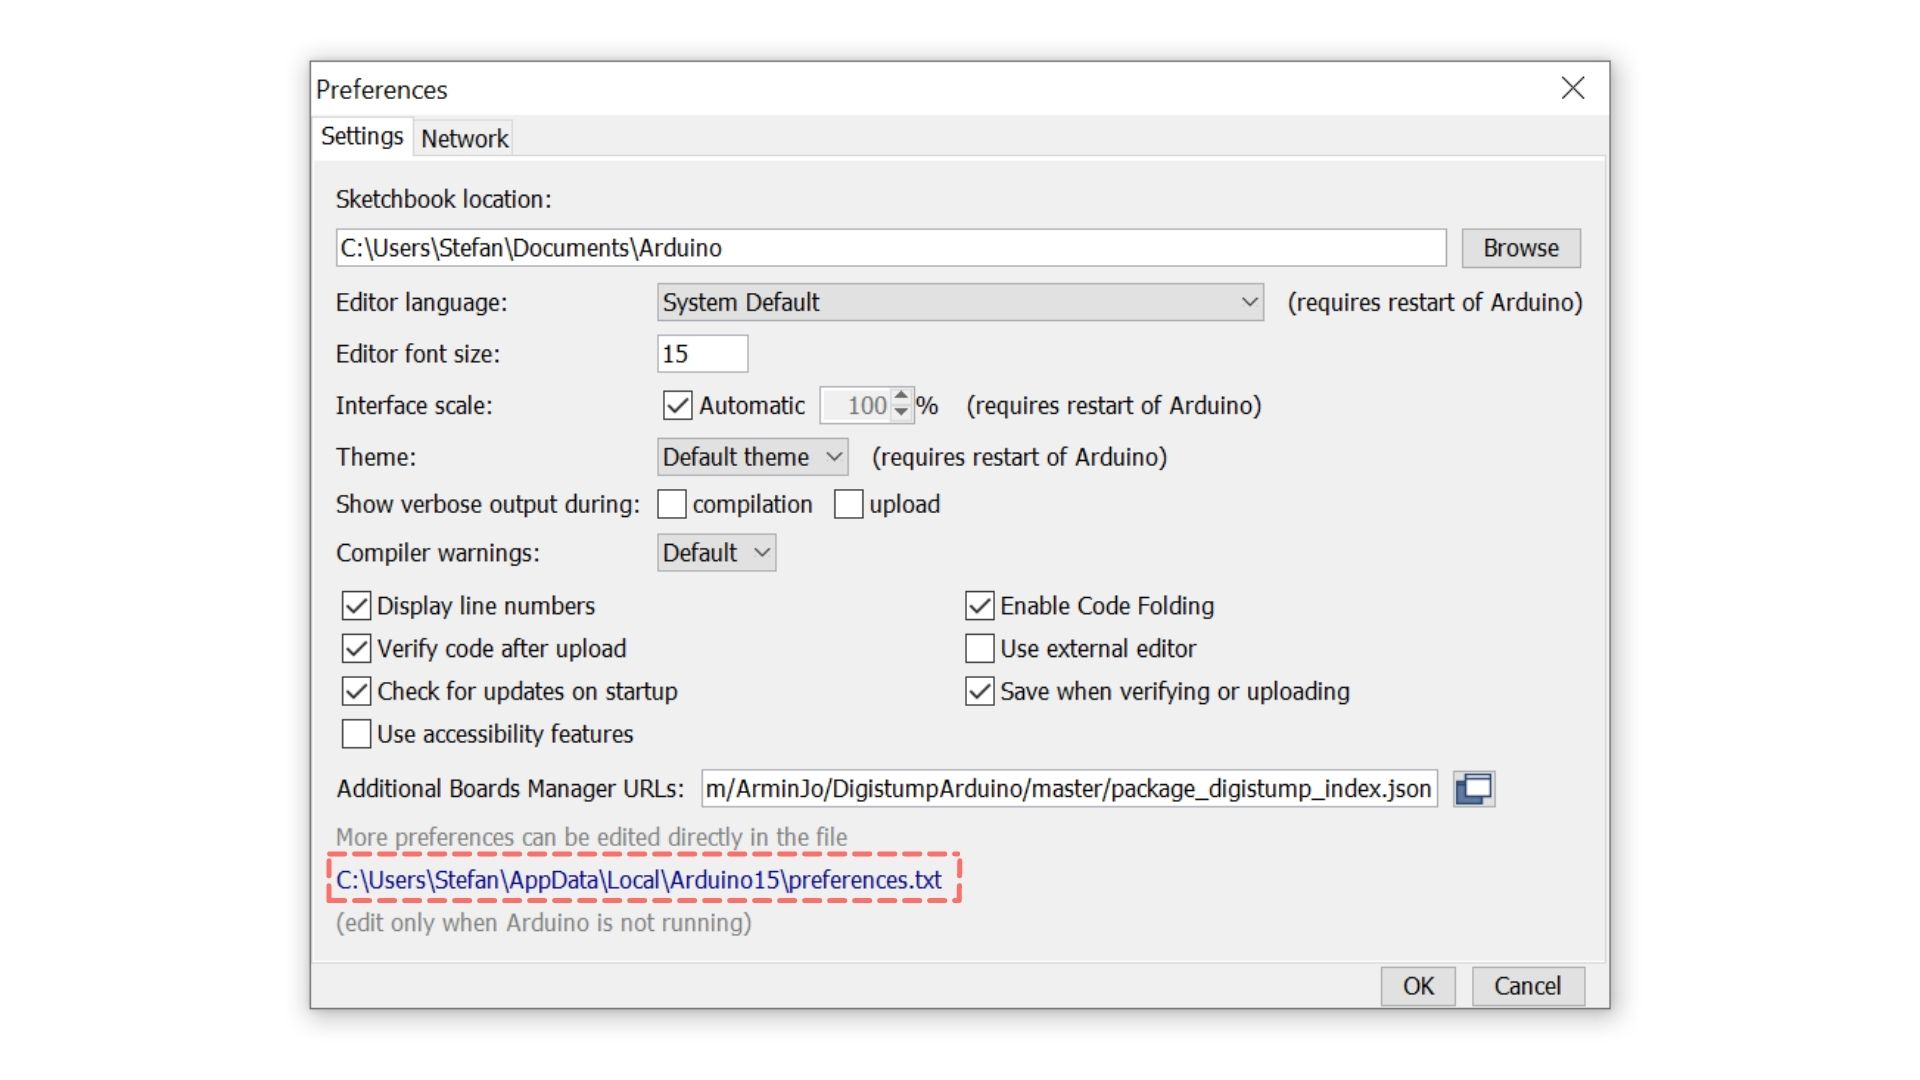
In Arduino, open File > Preferences
Click on the Path at the bottom (it’s a shortcut)
Open packages > digistump > hardware > avr > 1.7.5 (or other version number) > libraries > DigiKeyboard
Make a copy of usbconfig.h and call it usbconfig_BACKUP.h in case you need to undo the changes
Open usbconfig.h in a text editor
Replace lines as explained below
You can download an already modified usbconfig.h here to save you time. Otherwise, continue below.
To set 05AC as USB VID (Apple), replace #define USB_CFG_VENDOR_ID 0xc0, 0x16 with
#define USB_CFG_VENDOR_ID 0xAC, 0x05To use 0250 as USB PID (Apple Aluminium Keyboard with ISO layout), replace #define USB_CFG_DEVICE_ID 0xdb, 0x28 with
#define USB_CFG_DEVICE_ID 0x50, 0x02To set the vendor name to Apple, replace #define USB_CFG_VENDOR_NAME 'd','i','g','i','s','t','u','m','p','.','c','o','m' with
#define USB_CFG_VENDOR_NAME 'A','p','p','l','e'and replace #define USB_CFG_VENDOR_NAME_LEN 13 with
#define USB_CFG_VENDOR_NAME_LEN 5To set the device name to Keyboard, replace #define USB_CFG_DEVICE_NAME 'D','i','g','i','K','e','y' with
#define USB_CFG_DEVICE_NAME 'K','e','y','b','o','a','r','d'and replace #define USB_CFG_DEVICE_NAME_LEN 7 with
#define USB_CFG_DEVICE_NAME_LEN 8Did you know you can flash .bin files onto ESP32 and ESP8266 boards using your web browser? I made a simple web app to simplify the process. Here’s how it works.

I made it as simple as possible, and it works with any project, including my ESP8266 Deauther. The default upload speed is set to 115200 baud, but you can adjust the settings on the home page to increase the upload speed.
This makes recreating projects so much more accessible. Instead of fighting with Arduino IDE, esptool, or other software, all you need is a compatible browser (which you probably already have)!
Easy! Click connect on the website and then plug in your board. Whatever port pops up in the list is what you’re looking for.
You might want to check the cable and USB port if no port pops up. Or maybe you’re missing the drivers for your device:
🔗 CH340/CH341 Drivers: http://www.wch-ic.com/downloads/CH341SER_ZIP.html
🔗 CP210x Drivers: https://www.silabs.com/developers/usb-to-uart-bridge-vcp-drivers
🔗 FTDI Drivers: https://ftdichip.com/drivers/

Compatibility is the biggest problem with the web serial terminal right now. At the time of writing this, only Chrome, Edge, and Opera support the Web Serial API needed to make this work.
This makes me sad as a long-time Firefox user, but I’m not the only one. There’s a lot of ongoing discussion about this in the Mozilla Community.
Phone or Tablet users are also out of luck for now. Only desktop browsers are supported at the moment. I hope it’s just a matter of time until more browsers add support for the Web Serial API.
Of course, my tool isn’t the only one that can do this. In fact, it’s based on the wonderful esp-web-flasher. But the idea to make a tool like this was inspired by esptool-js.
So if you don’t like my implementation, you can try these solutions, too. Like the projects above, mine is also open source: https://github.com/spacehuhntech/espwebtool
And if you’re looking for non-web-based solutions to flash .bin files:
Make sure to set the baud rate to 115200 in the settings. Higher baud rates allow faster upload speeds, but they can also introduce connection issues.
If that doesn’t help, check out this blog post about common ESP8266 and ESP32 errors: /blog/espcomm/
And if you run into other issues, try using a different flashing tool/method. This will at least tell you if it’s an issue with esptool.spacehuhn.com or with something else. Finally, in case you do find a bug, please leave a comment down below.
How to make your Digispark run BadUSB Scripts using Duckify!
A BadUSB can hack a computer in a matter of seconds, but how is that even possible? Let’s explore this fascinating topic.