Skip to content

Blog

Deauther OLED Interface Explained

How to navigate the display UI of Deauther V2.

Unlike the serial and web interface, this requires you to have a Deauther with OLED display.

It uses a 128x64 pixel monochrome OLED display. These small and affordable displays are great for tinkering with electronics. Learn more about building your own Deauther OLED here.

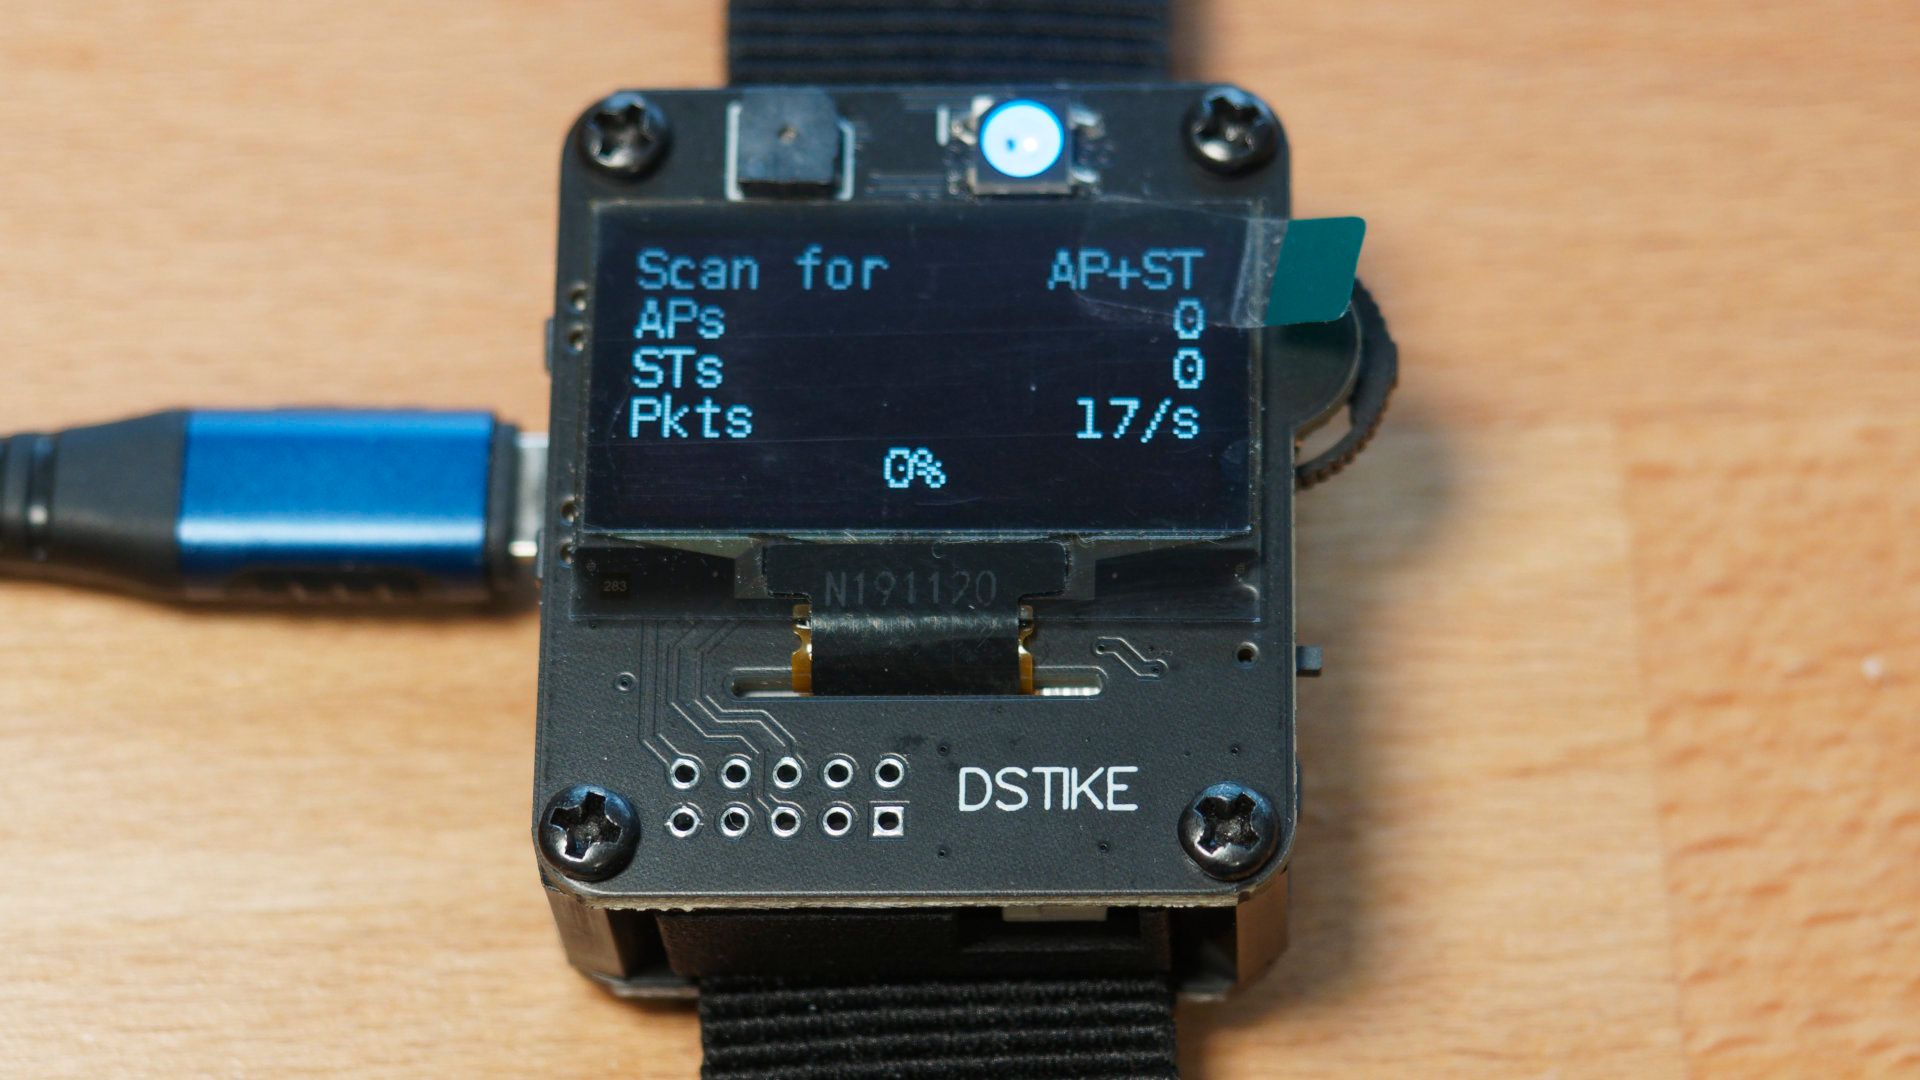
At startup, the Deauther is scanning for nearby networks. Give it a couple of seconds. The LED is blue while scanning and turns green once the scan is complete and the device is ready.

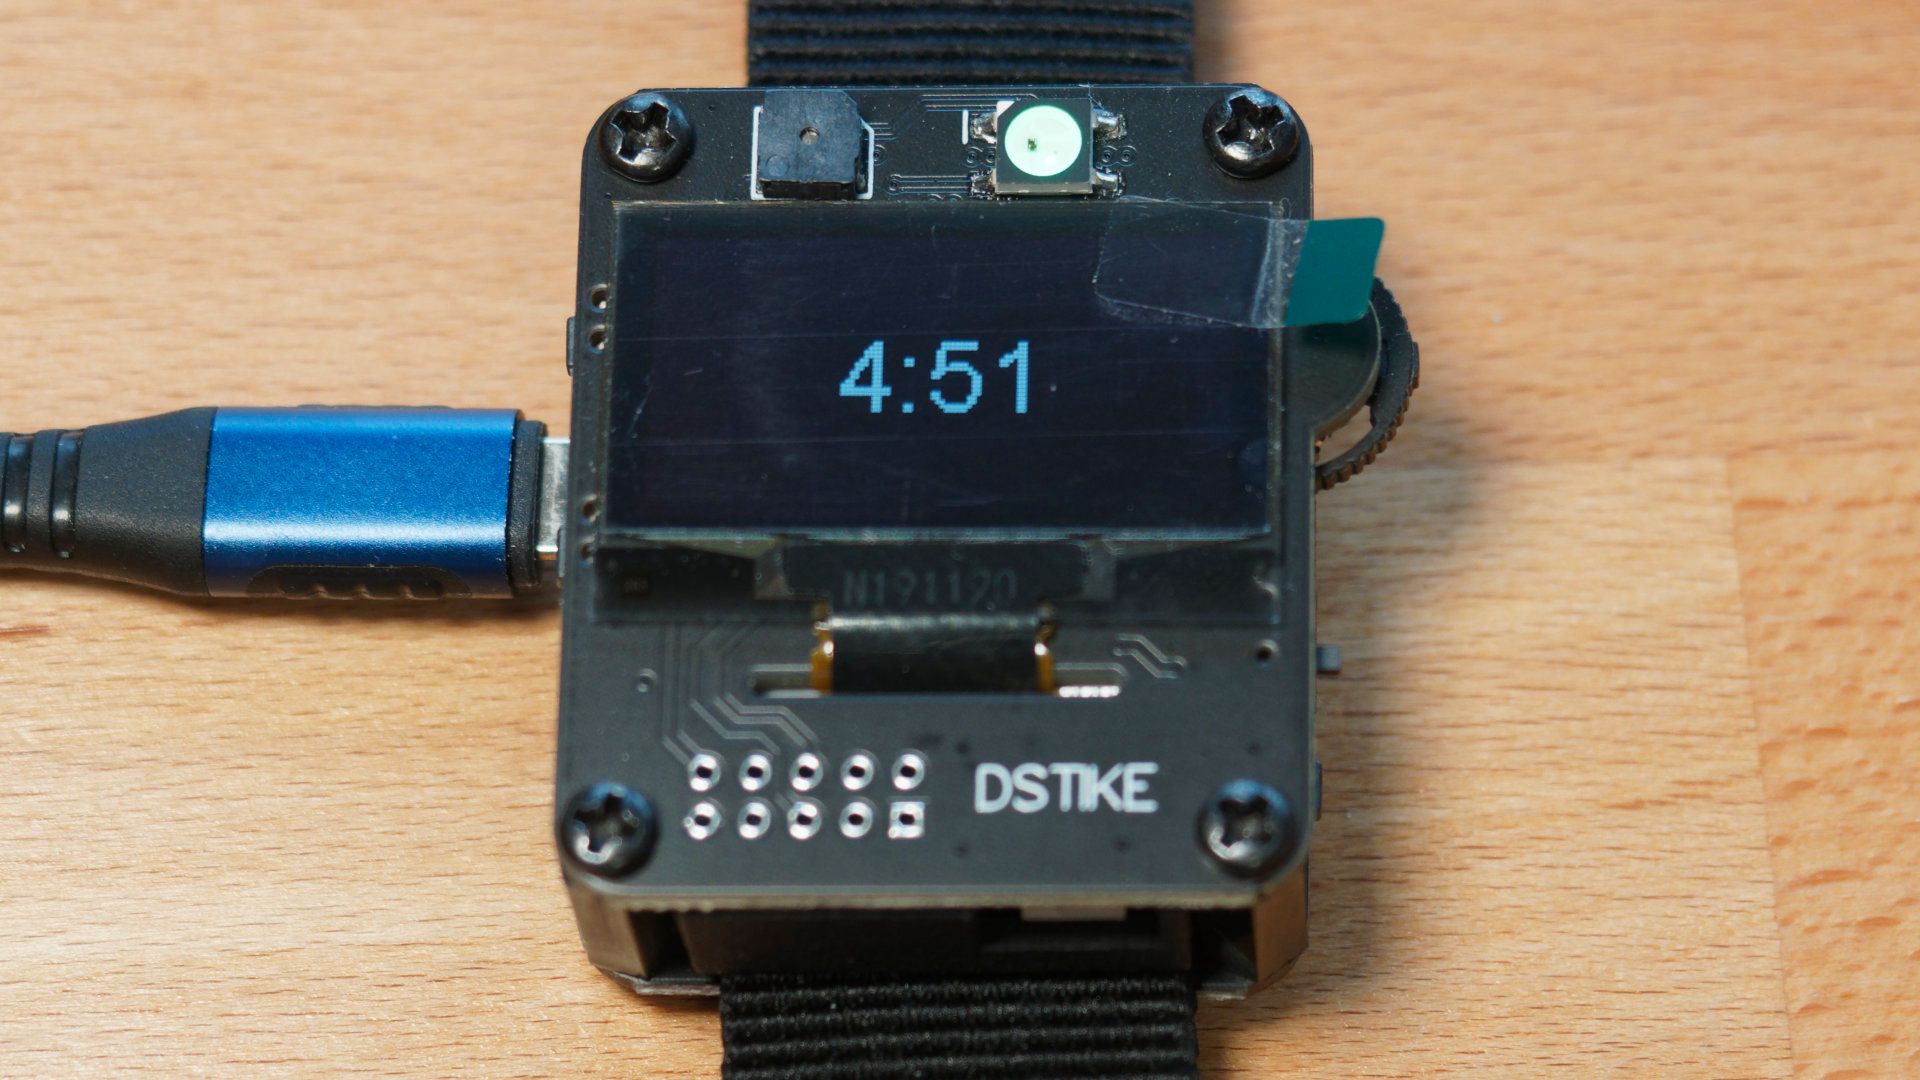
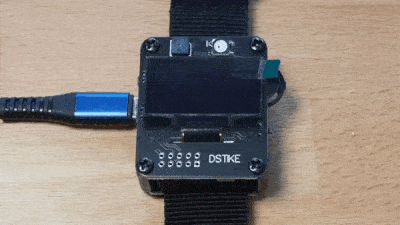
(I’m using the DSTIKE Deauther Watch here, you can get one at DSTIKE.com)

Turning on DSTIKE Deauther Watch

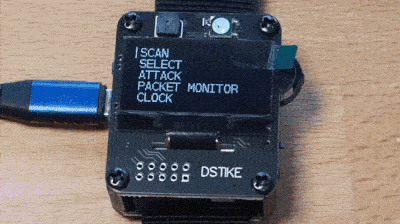
Navigation works by pressing the up, down, and select buttons. On the Deauther Watch, this is done with the 3-way switch on the side.

deauther-watch-buttons.gif

Deauther Scan Menu

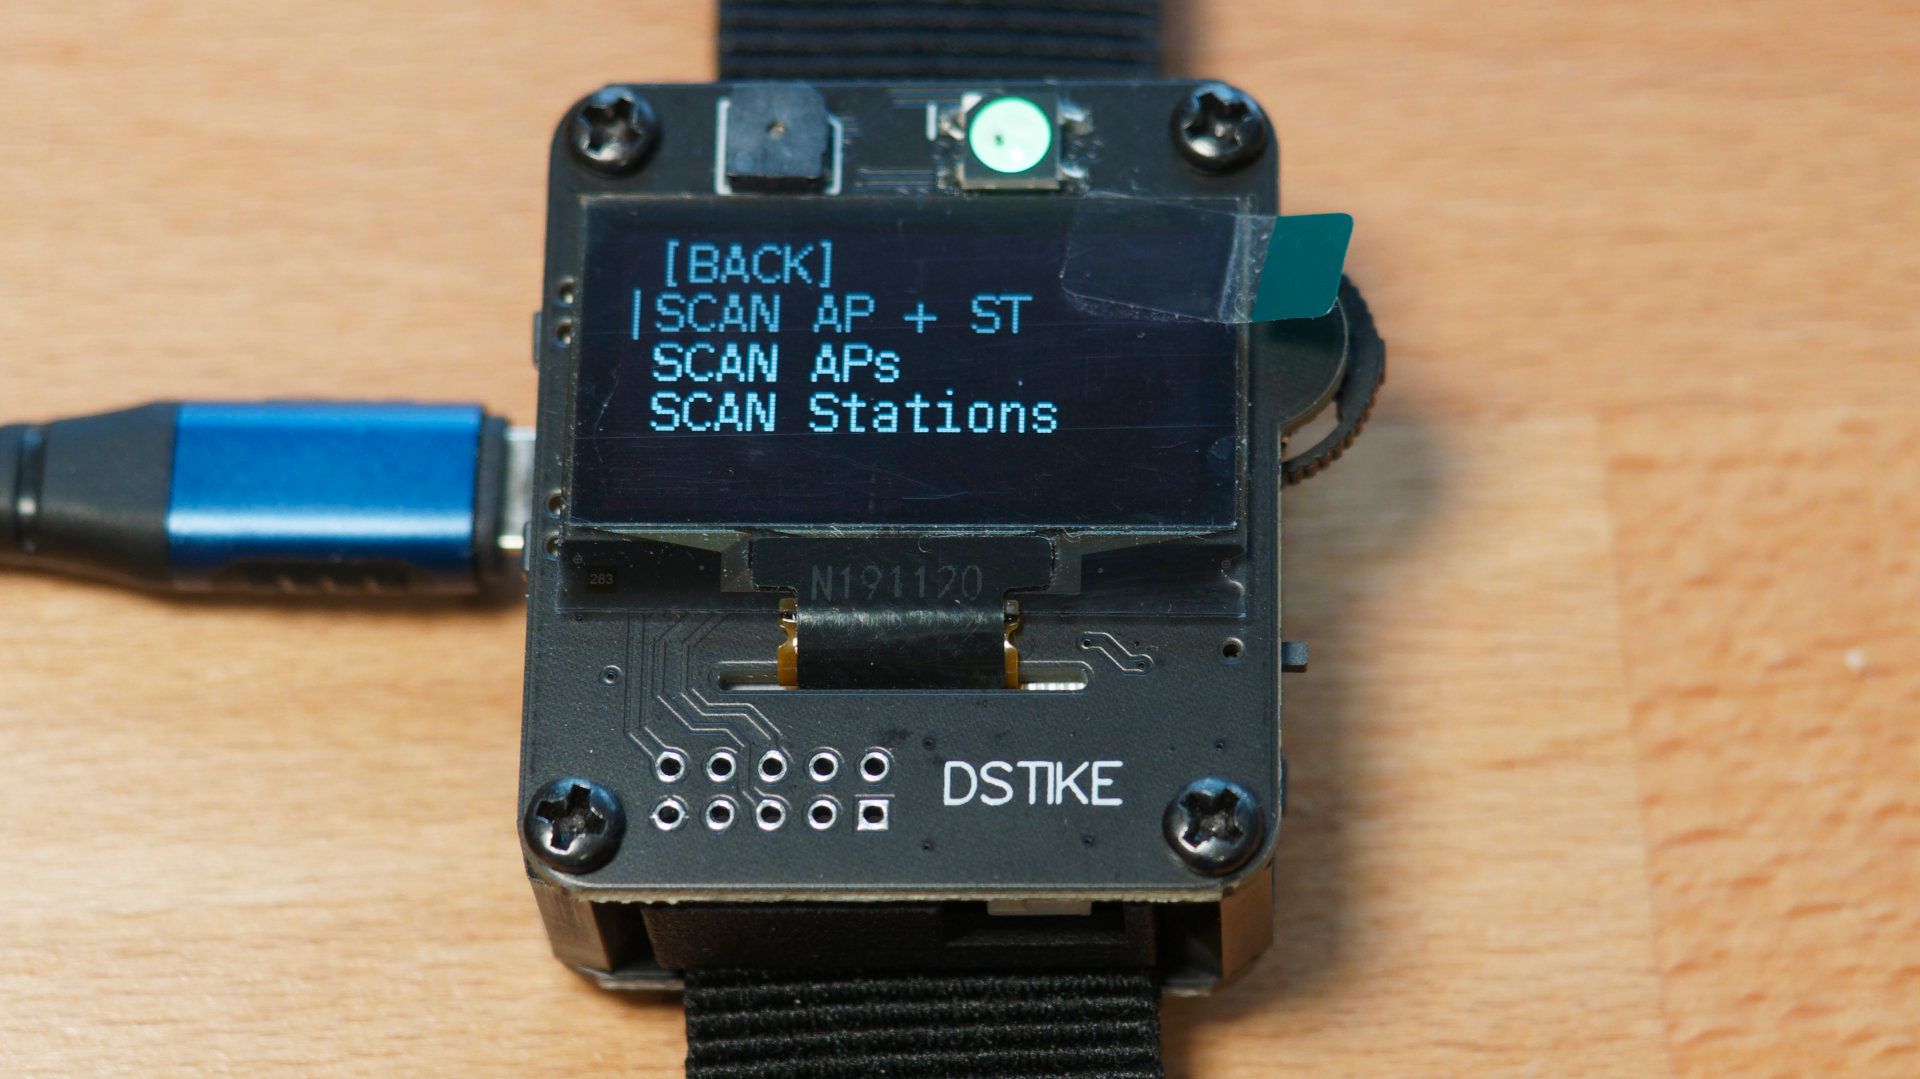
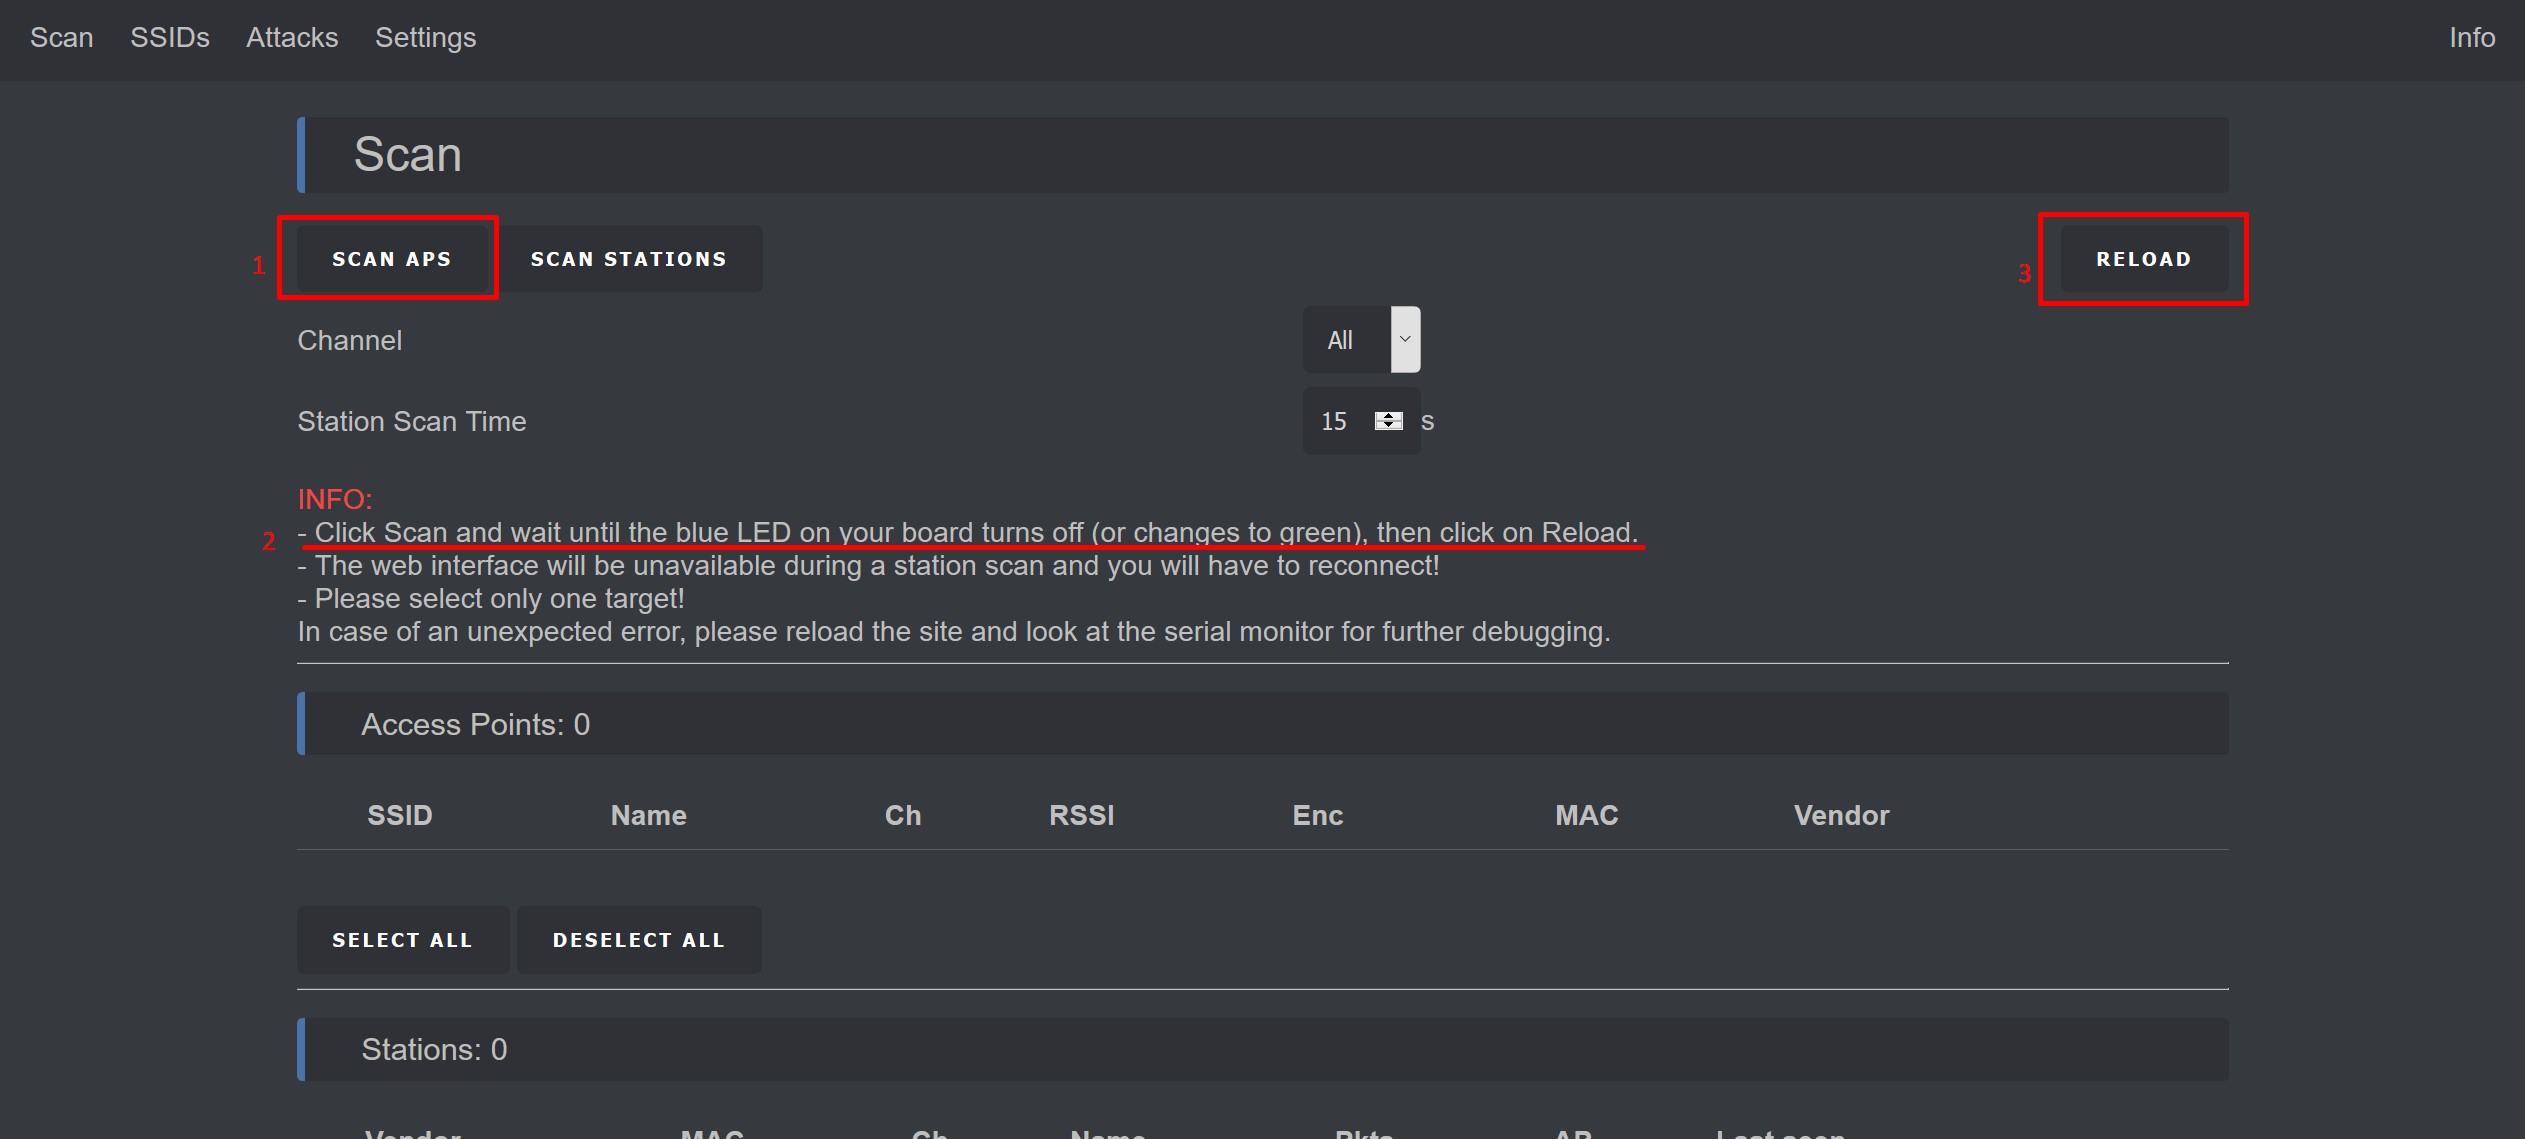
In the scan menu, you can initiate 3 different types of scans. You can scan for nearby WiFi Access Points (APs), WiFi Client Stations (STs), or both.

Deauther active Scan

Scanning for APs only takes a couple of seconds and will reveal all nearby networks. However, a station scan takes longer and can only find active clients while the scan is running. So it’s not guaranteed that you find a client device on the first try.
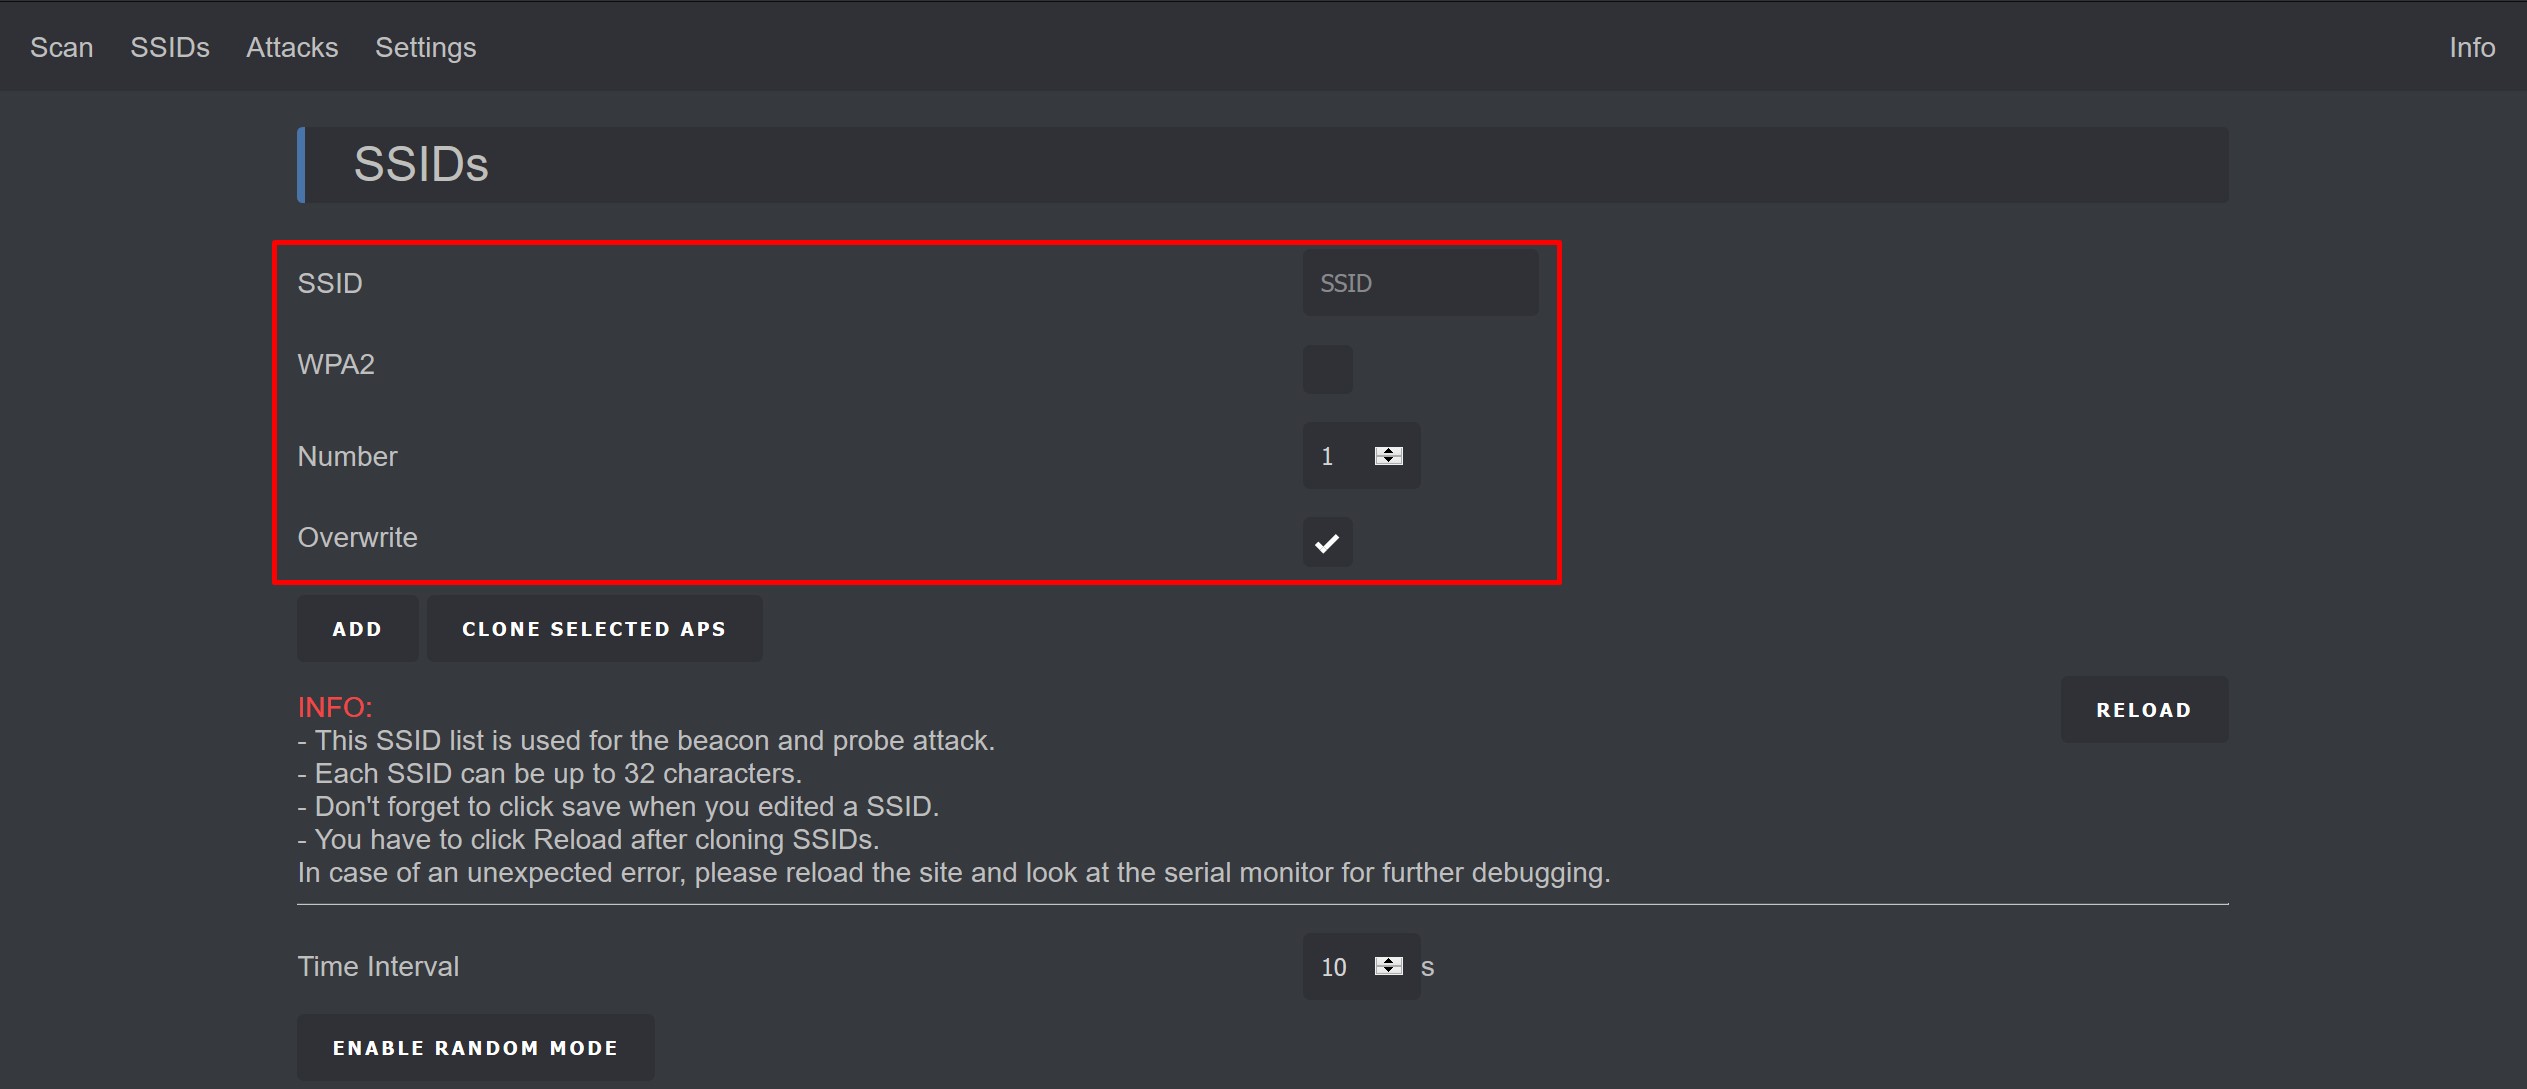
Deauther Select Menu

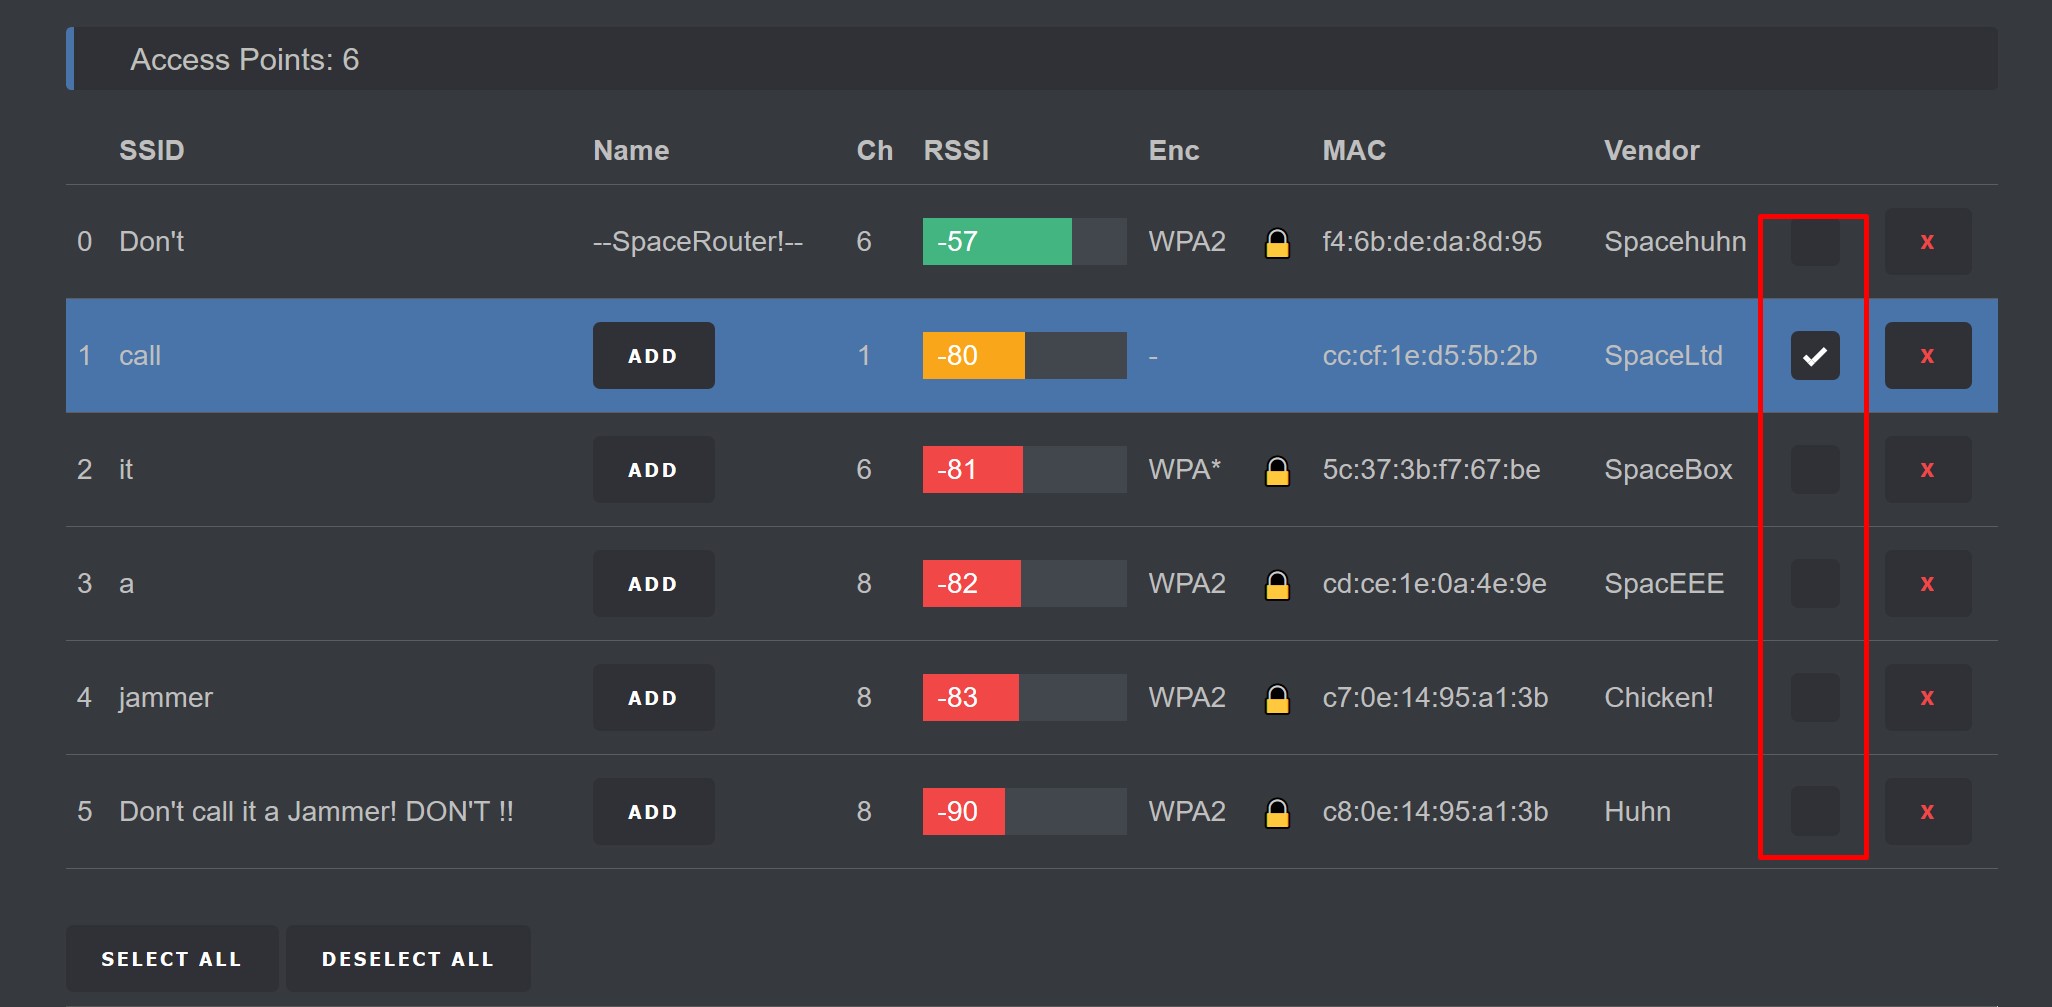
The select menu is where you select your targets for an attack. So this is where you find the APs and Stations from the scan, but also SSIDs for a beacon attack or other saved devices under Names.

Deauther Select AP Menu

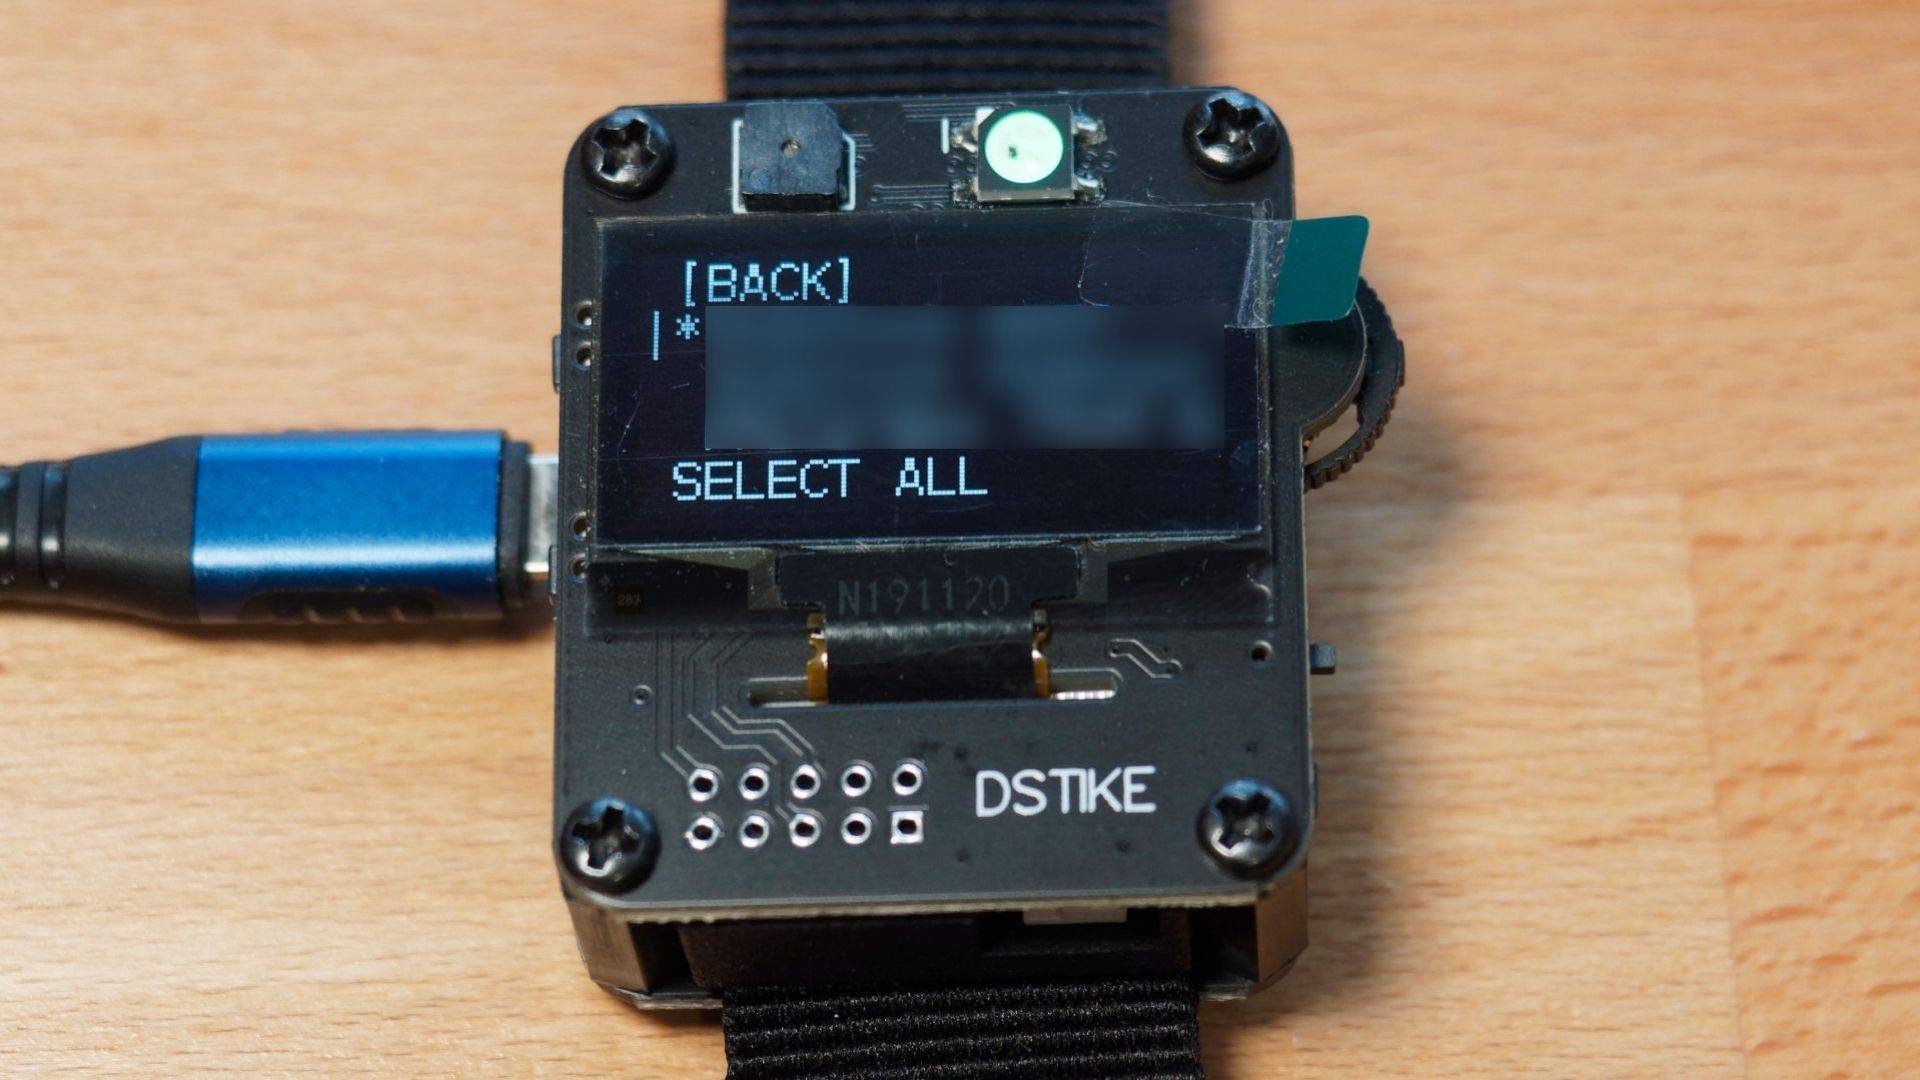
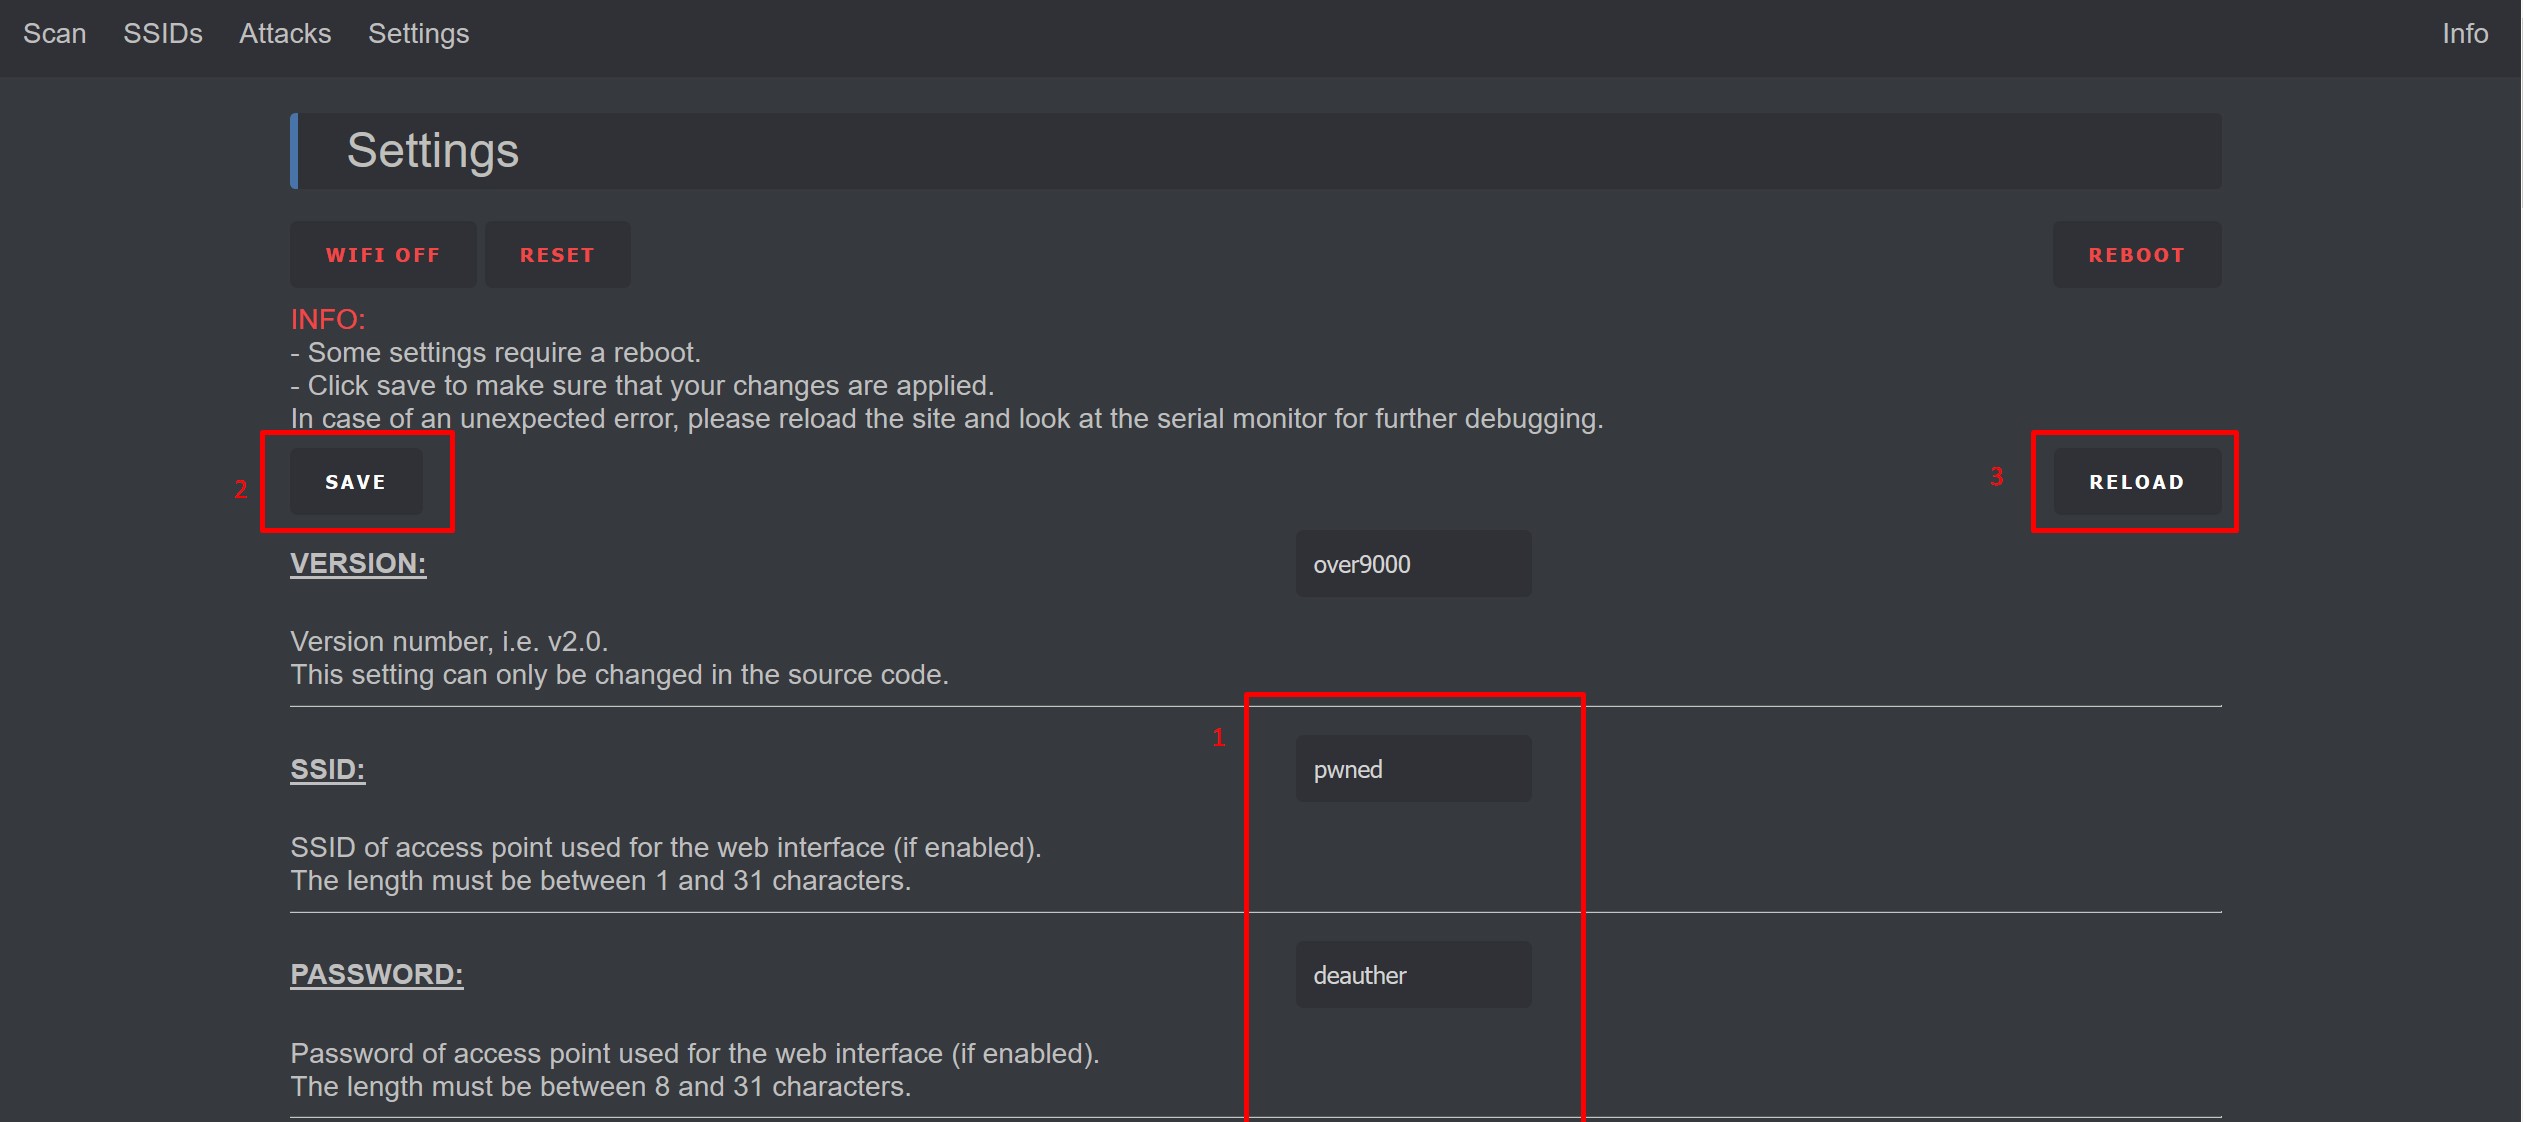
One thing to keep in mind is that the display interface only allows you to use the most essential functions of the Deauther. For example, to edit the SSIDs or Names,  you have to use the web interface or serial interface.

Deauther Attack Menu

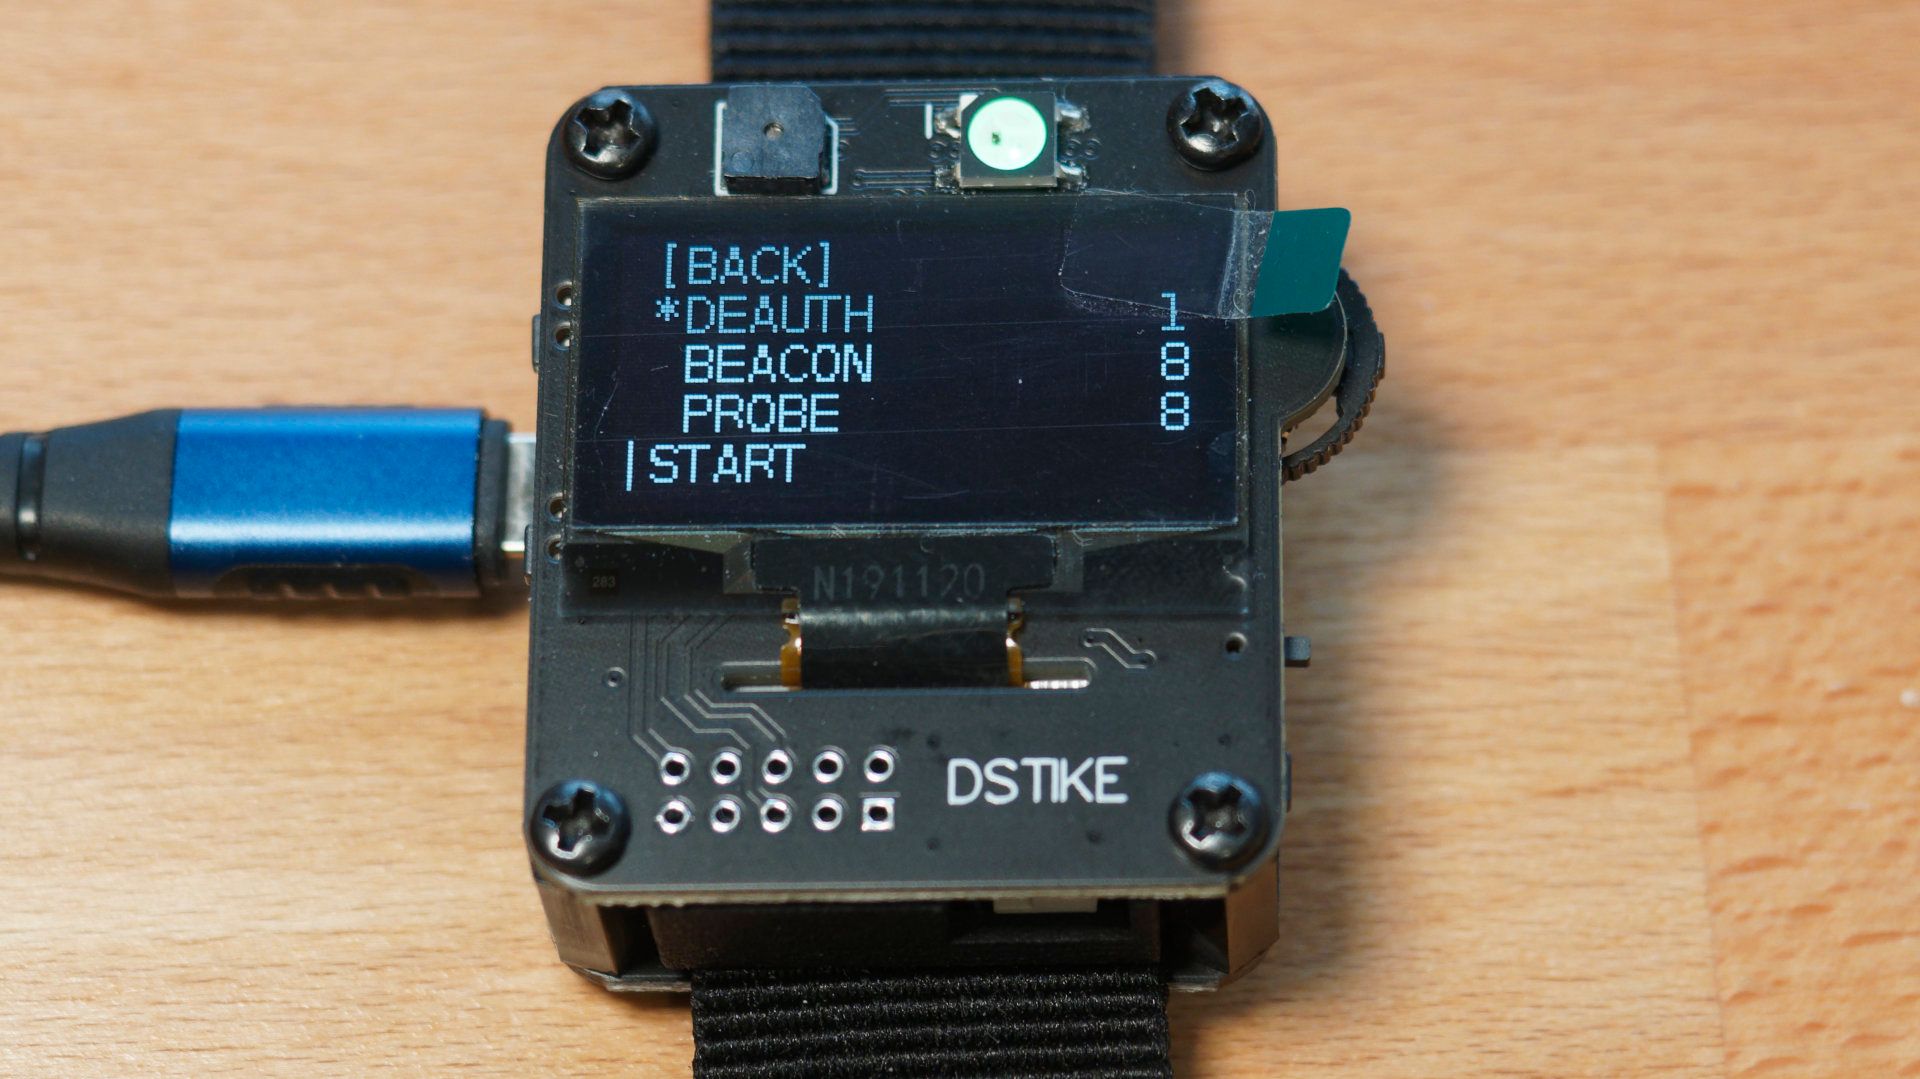
On the attack page, you start and stop different WiFi attacks:

  • DEAUTH is the deauthentication attack that will disconnect all selected devices.
  • BEACON is a beacon flooding attack
  • PROBE is a probe request flooding attack

Deauther running an attack

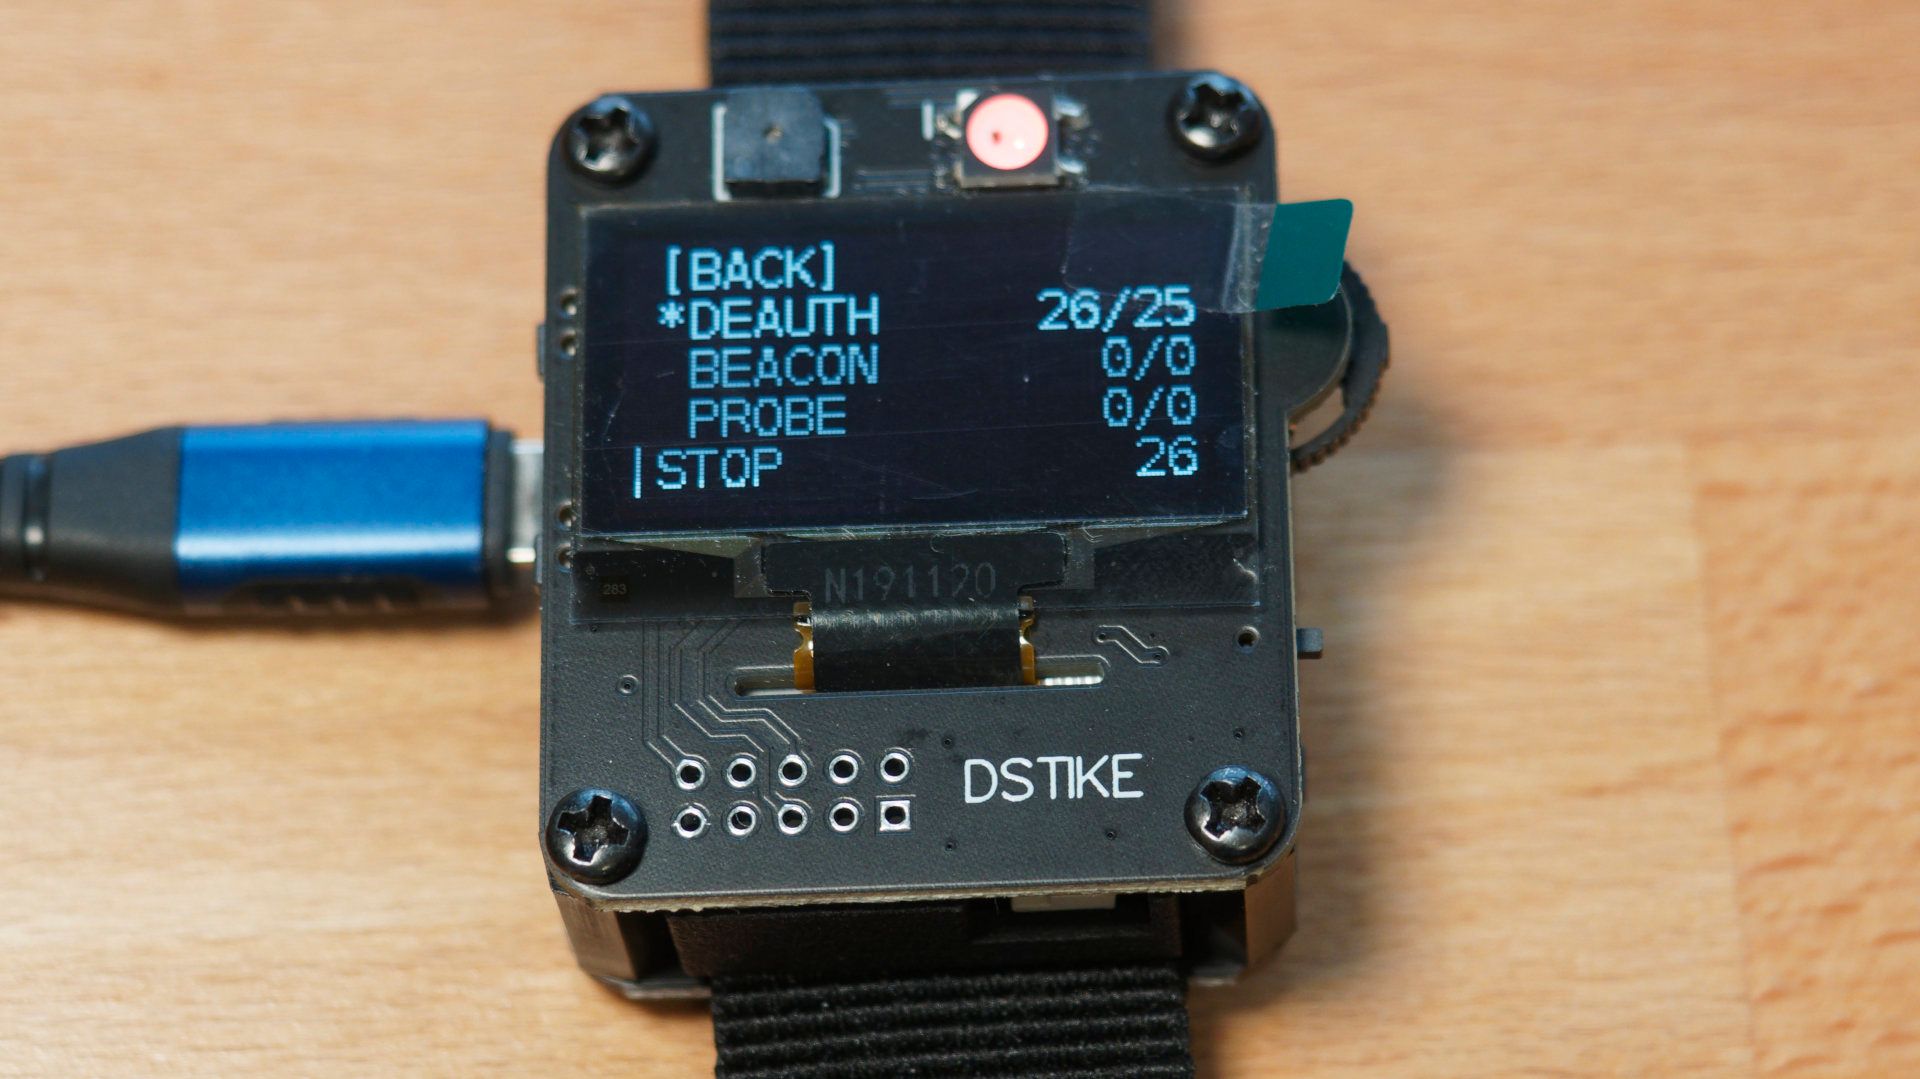
You can see the packets per second being sent. Here it’s sending slightly more than planned. This is on purpose. We thought it’s better to overshoot for one packet than to underdeliver. Depending on the selected targets, settings, and WiFi traffic around you, this number might be different for you.

Deauther Packet Monitor Menu

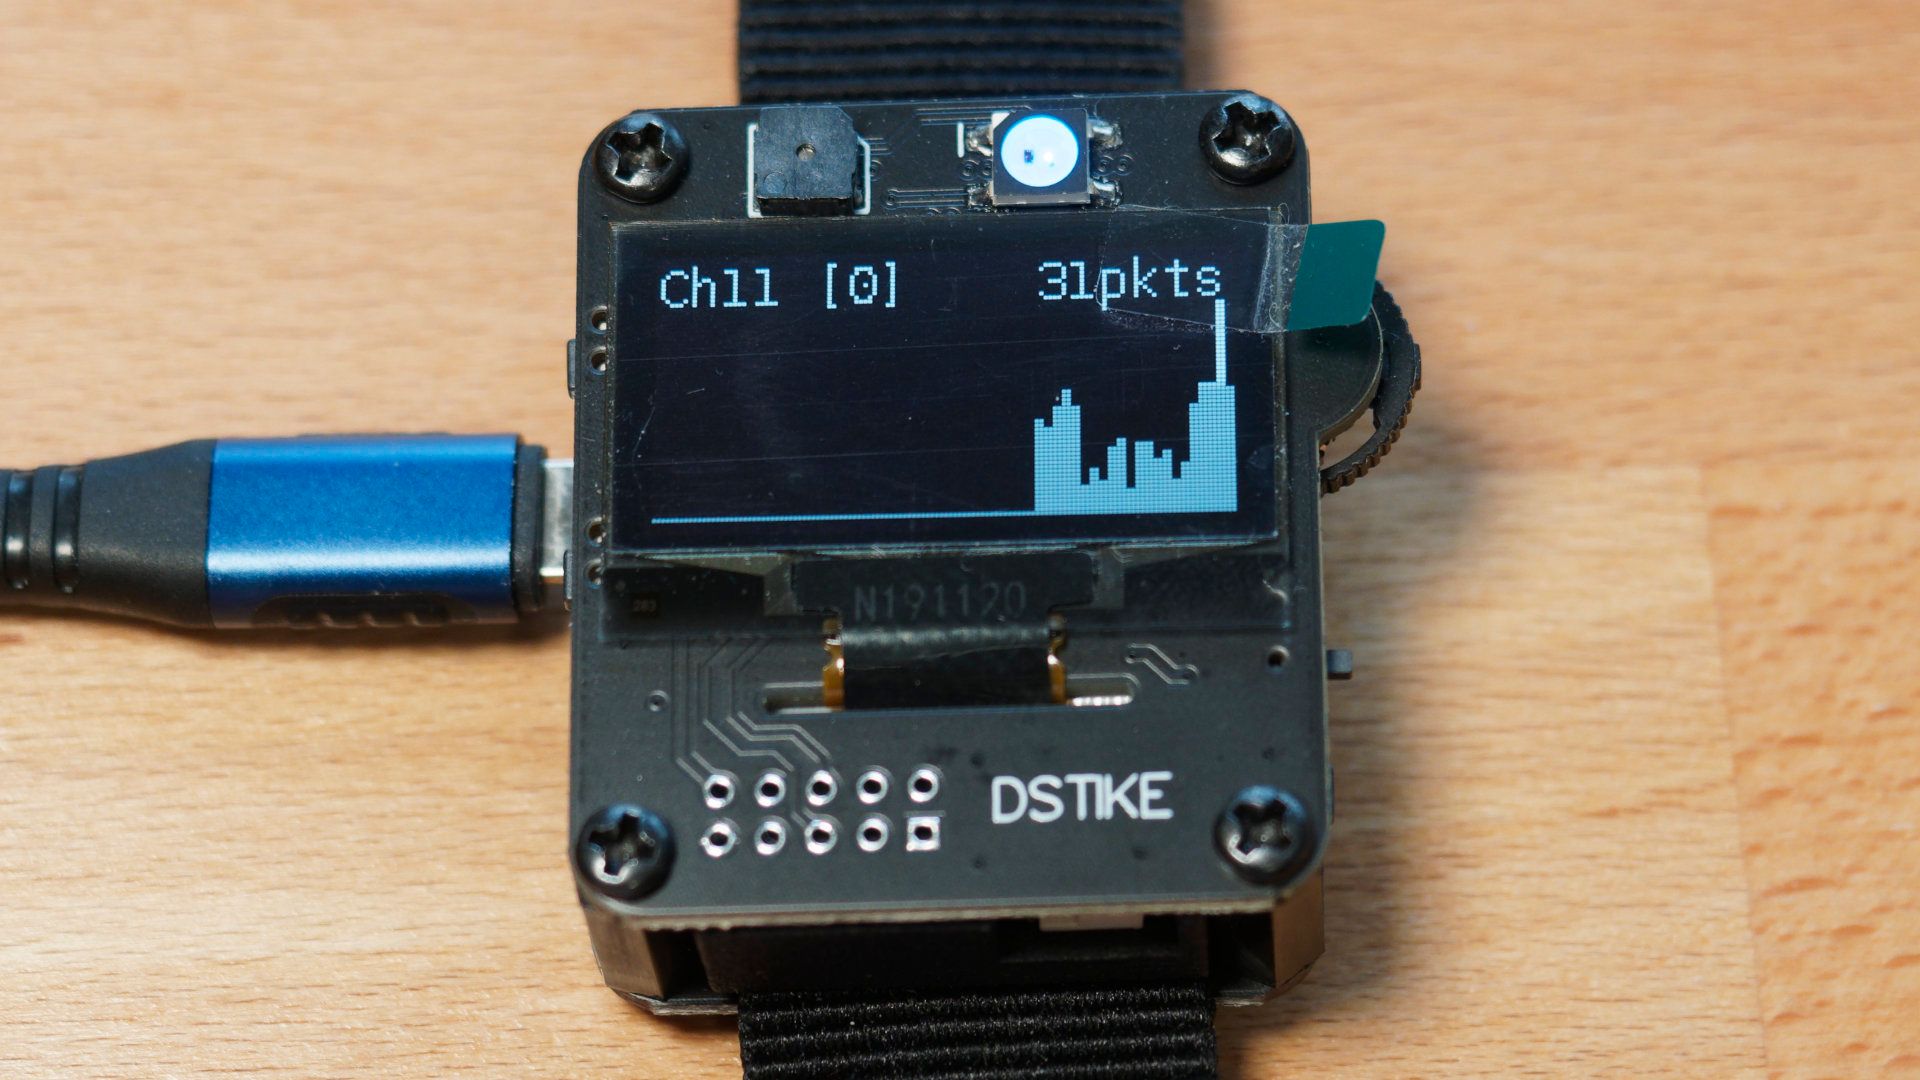
Here you see the WiFi traffic around you visualized. Switch channels with the up and down buttons. The number in the brackets indicates deauth packets, so you can check if an attack is currently active in your area.

Deauther Clock Menu

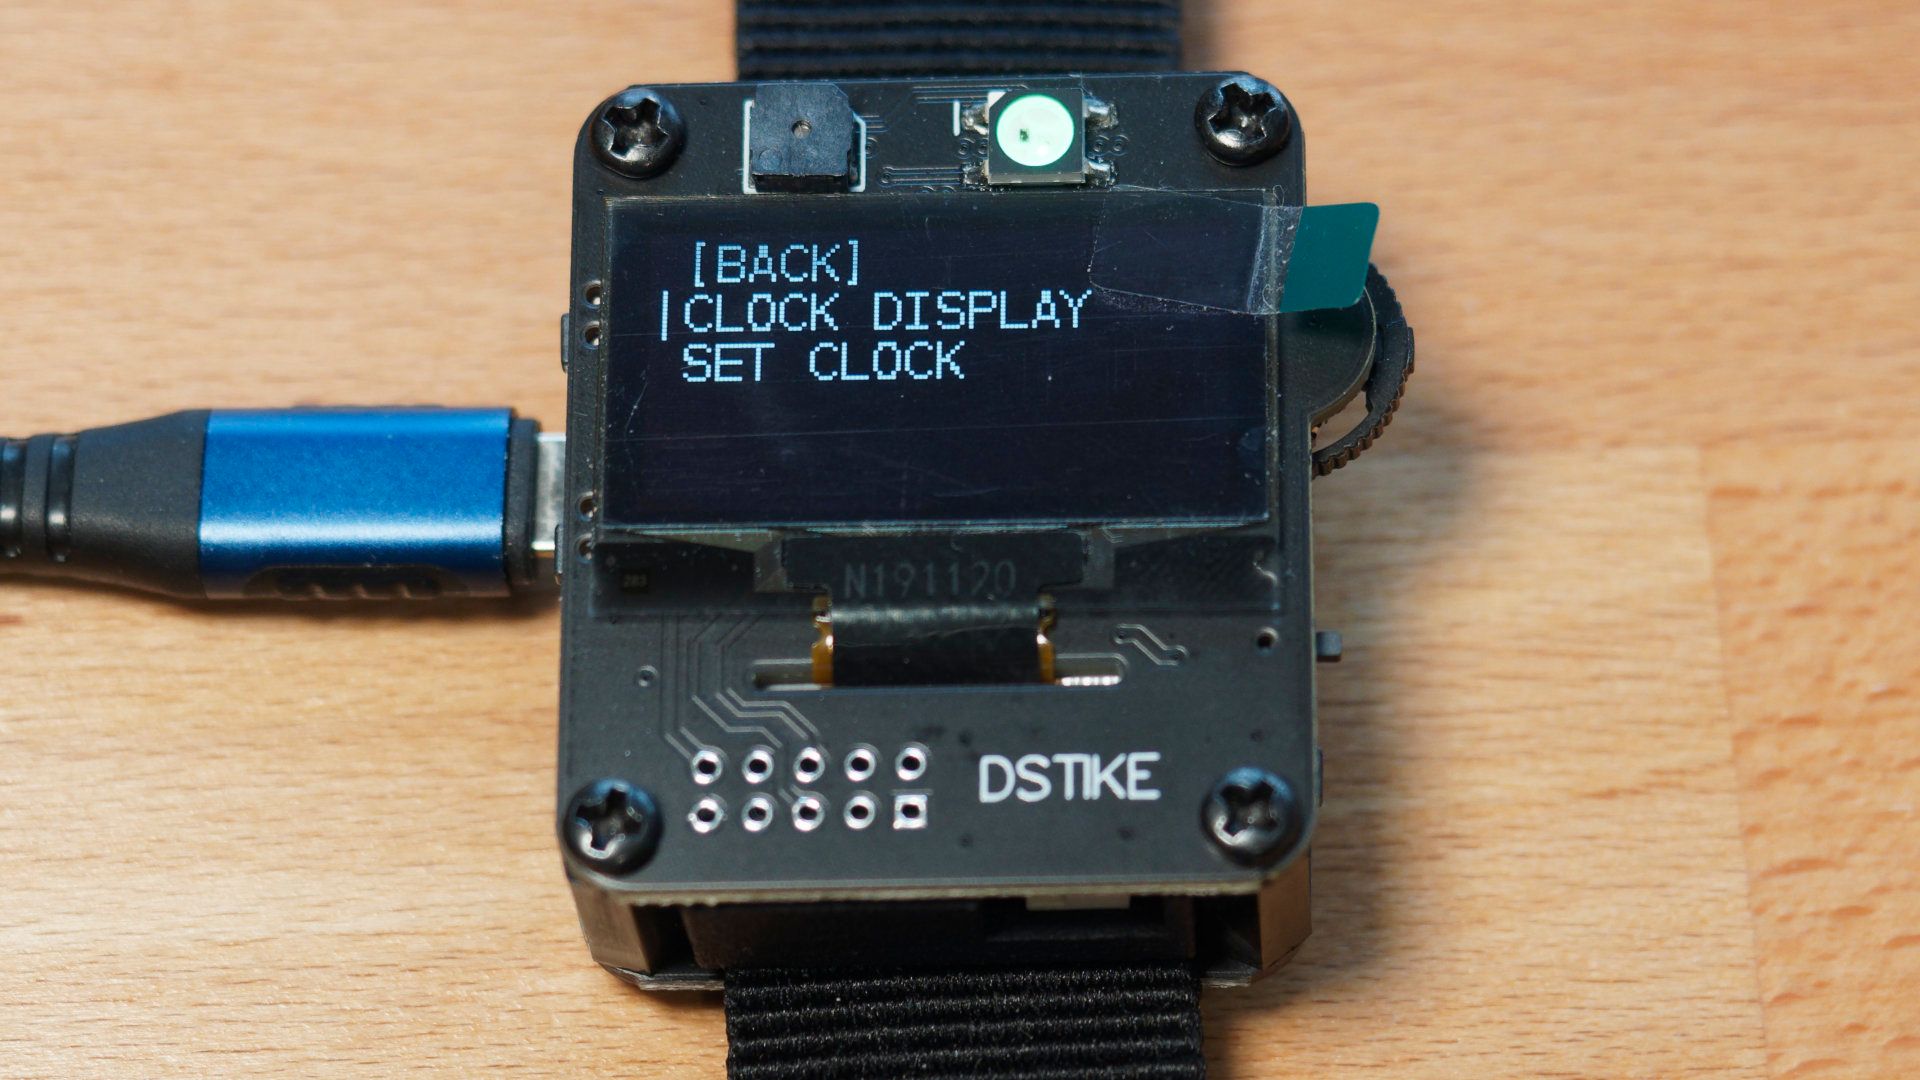
The clock menu is a feature requested by many customers of the DSTIKE Deauther Watch. You can set a time and display it. It helps make it appear as a regular smartwatch. But don’t expect anything beyond that fundamental functionality.

Deauther running the clock feature

Deauther Serial Interface Explained

Here we will look at getting access to the ESP8266 Deauther V2 Serial Interface and some valuable tips and tricks.

We now have terminal.spacehuhn.com, an online serial terminal. A great alternative where you don’t need to install anything. You just need a compatible browser. Learn more

  1. Open terminal.spacehuhn.com with Chrome, Edge, or Opera for desktop. (Other browsers are not supported at the moment)

  2. Click connect

  3. Plugin your ESP8266 board

  4. Select the port that pops up in the list and click connect

Using terminal.spacehuhn.com

  1. Connect the ESP8266 board to your computer

  2. Open Arduino, go to Tools > Port, and select the corresponding serial (COM) port

  3. Go to Tools and click on Serial Monitor

  4. Select Newline and 115200 as baudrate

Arduino select Serial Port

Arduino Open Serial Monitor

Arduino Serial Monitor: Select Newline  115200 baud

Startup message of Deauther Serial Interface

Alternatively to Arduino, you can use Huhnitor. It was made for the Deauther V3 but works on the V2 just as well. Check out our tutorial here: /blog/huhnitor-installation/

You can find a list with all serial commands here

In the serial interface, commands and parameters are divided by spaces.

This command is OK:

add ssid test

This command isn’t:

add ssid this is a test

To escape these spaces, you can use a backslash . For example:

add ssid this\ is\ a\ better\ test

But a better approach is to use double quotes ”. For example:

add ssid "this is an even better test"

To chain multiple commands into one line, separate them with two semicolons ;;

sysinfo;;chicken

This example will first execute “sysinfo” and then “chicken”.

There is no limit on the number of commands you can combine with this feature, but there is a limit of 512 characters per line!

Some commands like “scan” work asynchronous and don’t block. To chain commands like this, you can make use of the “DELAY” command:

scan wifi -t 10s -ch 6;;DELAY 11s;;show stations

This example will scan for 10 seconds on channel 6 and wait 11 seconds before printing the results. Note that it’s always better to use a higher delay than you expect the previous command to run, just to be on the safe side.

The ESP8266 has a memory chip of usually 1,2 or 4 MB of storage - depending on the model, it could be up to 16 MB or as low as 512 KB. The firmware itself is saved there together with some other configuration settings.

SPIFFS (SPI Flash File System) is a small simplistic file system to easily access the internal memory. It’s particularly useful to store and access data that doesn’t fit into the RAM.

You can see how much of the SPIFFS is free and what files are stored there with the sysinfo command:

sysinfo

You can see the contents of a file using:

print <path_to_file>

To delete a file, run:

delete <path_to_file>

Sometimes the file system gets corrupted, and you will see errors like “ERROR: saving /settings.json”. If that happens, clear the memory by running:

format

Deauther Web Interface Explained

Everything you need to know about the ESP8266 Deauther V2 Web Interface.

To access the web interface, you have to have your Deauther running and connect to its WiFi network pwnd with the password deauther.

Then open your browser and visit 192.168.4.1. Make sure you’re not connected to a VPN, or anything else that could get in the way. You have to temporarily disable the mobile connection on some phones to make it work.

If you can’t see a pwned network, ensure ESP8266 Deauther firmware was successfully installed. We made a tutorial for that, which you can find here.

ESP8266 Deauther Home / Warning Page

The first thing you’ll probably see when you open the web interface is a warning that you have to confirm to continue.

We felt this was necessary when making it since many users would abuse our tool and spread misinformation about how it works.

Deauther Scan Page

You can discover access points (WiFi networks) and stations (client devices) nearby on the scan page. If the access point list is empty, click on SCAN APS.

A scan takes a few seconds (usually 2 - 5 seconds). Depending on your board, you might see a LED turning on when starting the scan. As soon as the scan is finished, it turns off, signaling you to click on RELOAD to see the scan results.

Deauther Scan Page

Once you have a list of the access points, you can select them for an attack. But make sure to only select your own networks. Attacking other people’s networks on purpose is strictly prohibited!

You can select multiple targets, but it’s recommended to select only a single one for stability and performance reasons.

You can also scan for stations to select a specific client rather than an entire network. While a station scan is running, the web interface will be unavailable. You have to wait until it’s finished and then reconnect.

Deauther SSID Page

This is where you can add, edit and remove SSIDs. An SSID (Service Set Identifier) is the name of a WiFi network. They are used in beacon and probe attacks.

Deauther SSID Page

Deauther Attack Page

On the attack page, you start and stop WiFi attacks such as Deauthentication, Beacon, and Probe.

You may lose connection to the web interface when initiating an attack, but if you only selected one target, you may be able to reconnect to it without problems. Attacks stop after 5 minutes by default. This is intended behavior to prevent abuse.

The pkts/s info is not automatically refreshed to save resources. You have to manually click RELOAD.

Deauther Settings Page

You can edit device settings here, such as the SSID and password of the Deauther’s network. But make sure to hit SAVE after changing something and click on RELOAD to refresh the site and check whether or not your changes were applied.

When using this tool, a thing to keep in mind is that the ESP8266 Deauther project was a proof of concept that became a popular tool for beginners to learn about WiFi hacking.

It’s not a professional tool. It’s free and open source. So please understand that:

  • The web interface is sometimes unstable and creates errors.
  • You will lose connection to the Deauther when starting a scan or an attack.
  • The attacks are meant for testing. They are not guaranteed to work. Learn more here.
  • The amount of networks and devices you are able to pick up and attack is limited by a variety of external factors, including but not limited to the transmit power of such a small device and its antenna.

WiFi Channels Explained

If you dipped your toes into WiFi hacking, you probably encountered a channel setting here and there. But what are these channels, and how do they work?

2.4 GHz Wi-Fi channels (802.11b,g WLAN) Source: https://en.wikipedia.org/wiki/List_of_WLAN_channels (CC BY-SA 3.0)

WiFi is a communication protocol that can run on different frequencies, the most common band is 2.4 GHz, which is divided into 14 channels.

Channel 14, however, is only used in rare cases. And North America uses only channels 1 to 11.

Each 2.4 GHz channel is 20 MHz wide plus a 2 MHz gap as Guard band. But as you can see in the diagram above, neighboring channels overlap. That’s why channels 1,6, and 11 are usually the first choice. They don’t overlap each which leads to less interference.

This overlapping is also why in some applications, when you can scan a specific WiFi channel, you still receive packets from neighboring channels.

Your home router will automatically select the best-performing channel based on other existing WiFi networks nearby. But this automatic selection is not always the greatest. To get a picture of the networks and channels nearby, you can use a WiFi scanner app.

With the 802.11n WiFi standard, it’s also possible to use two 20 MHz channels to form a 40 MHz wide channel (for example, channel 1-5 or channel 9-13). This, however, is not used a lot at the 2.4 GHz range since it overlaps with a lot of other channels. It would provide the advantage of higher bandwidth, but it’s is often crippled by the added interference.

As you probably know, 5 GHz is the more modern option when using WiFi since it allows for much higher data rates. This is also partly due to the channels because, at 5 GHz, we have channels 36 to 165 available for WiFi. Each one is 20 MHz wide.

But that’s not all. Channels can be combined to form 40, 80, or even 160 MHz channels to allow incredibly high bandwidths.

If you want to learn more about the 5 GHz channels, we recommend checking out this incredibly detailed table on Wikipedia.

Cell Tower

WiFi works on a variety of frequencies. 6 GHz seems to be the next big thing. But it can also run on 900 Mhz, 3.65 GHz, and even 60 GHz.

A lower frequency will generally be slower but allow for a higher range. While frequencies like 60 GHz can allow for incredibly high speeds but will have problems going through a single wall.

To make use of these new WiFi frequencies, you’ll need both an access point (i.e., WiFi router) and a client that supports that frequency.

TV Channel

Having a lot of available channels is great because it means that more networks can coexist without interfering with each other. It also means that anyone who wants to monitor the WiFi traffic, for good or bad reasons, will have to put in more effort.

With one WiFi interface, you can only monitor one channel at a time. So you either have to invest in a lot of hardware to surveil as many channels as you can, or you have to do channel hopping.

Channel hopping means ‘hopping’ every X milliseconds to another channel in a loop. Imagine it like quickly switching through all the TV channels.

That way, you can run through and receive data from many channels. But because you can only receive data from one channel at a time, the more you hop, the more information you might lose on any other channel you’re currently not scanning on.

To further visualize this problem, we made a Project called WiFi Satellite some time ago that uses 14 ESP32 boards to monitor the traffic of all 14 2.4 GHz WiFi channels.

How to Install ESP8266 Deauther using Arduino IDE

Do you want to build your own ESP8266 Deauther? Here is the official installation guide for using Arduino IDE.

The ESP8266 Deauther is a popular open-source pen-testing tool. You can test your own WiFi network against the common denial-of-service vulnerability called deauthentication attack. You can also use it to create the appearance of a lot of WiFi networks that are not really there to learn and experiment with WiFi.

And the best part, all you need is an ESP8266! Not sure which one to get? We made a post about development boards we recommend: /blog/recommended-deuther-boards/

Before you can go and install the ESP8266 Deauther, make sure to have downloaded the project and the Arduino IDE.

  1. Download and install Arduino IDE: https://www.arduino.cc/en/software
  2. Download ESP8266 Deauther Firmware

Follow these steps

  1. Extract the ESP8266 Deauther zip you downloaded
  2. Go into the esp8266_deauther folder and open esp8266_deauther.ino with Arduino IDE
  3. In Arduino IDE, go to File > Preferences and add this URL to the Additional Boards Manager URLs: https://raw.githubusercontent.com/SpacehuhnTech/arduino/main/package_spacehuhn_index.json
  4. Now go to Tools > Board > Boards Manager, search deauther and install Deauther ESP8266 Boards
  5. Select your board at Tools > Board and be sure it is at Deauther ESP8266 Boards (and not at ESP8266 Modules)!
  6. Plugin your Deauther and select its COM port at Tools > Port
  7. Press upload

Done 🎉